Understanding mountain and valley folds can be as fun as unrolling a surprise party! A mountain fold makes your paper peek upward, resembling a proud little peak, while the valley fold creates a cozy dip, just waiting for paper hikers to rest. To create a mountain fold, start with your origami square flipped over; fold the top edge down and voila! For valleys, just bring one edge down to meet the other. Both folds are vital for crafting everything from delightful cranes to curious butterflies. Practice on simpler models first and soon you’ll be scaling new heights in the wonderful world of origami!
Table of Contents
- Understanding Mountain and Valley Folds
- Folding Techniques for Beginners
- Mountain Fold Instructions Step-by-Step
- Valley Fold Instructions Made Easy
- Practical Tips for Perfect Folds
- Common Uses in Origami Designs
- Additional Techniques to Explore
- Recommended Practice Models for Fun
- Resources for Further Learning on Folds
- Frequently Asked Questions
Understanding Mountain and Valley Folds
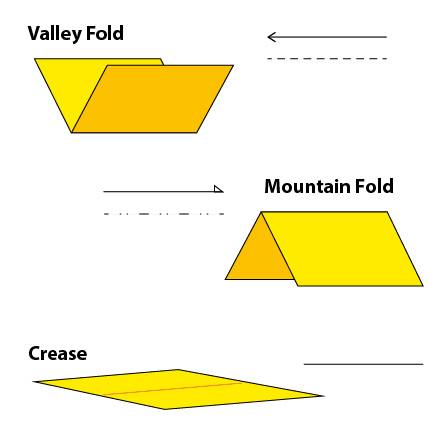
Mountain and valley folds are the dynamic duo of the origami world, much like peanut butter and jelly, or Batman and Robin. A mountain fold creates a peak, resembling a tiny paper mountain, where the crease sits proudly at the top, hidden away behind the paper, looking all majestic. Picture it as a paper superhero, standing tall with its triangular crest (▲). On the flip side, we have the valley fold, which dips down like a cozy little valley, with the crease tucked neatly at the bottom, eagerly waiting to be revealed (V).
When you’re folding, remember: mountain folds go up and valley folds go down, kind of like a rollercoaster ride for your paper. If you’re looking to make something fabulous, like a hat that would make any origami owl jealous, you’ll find mountain folds strutting their stuff. Valley folds, on the other hand, are often called upon to create bridges, giving your paper creations a way to cross from one side of the table to the other.
Now, let’s talk about the importance of those creases. The sharper your creases, the sturdier your origami masterpiece will be, like a well-pressed shirt ready for a first date. If you’re feeling fancy, bone folders can help you achieve that crispness, but don’t fret if you’re in a pinch. Your fingernails can work just fine too! Just be careful, because paper cuts are the origami equivalent of a bad hair day. And while we’re on the topic, thicker paper can be a bit of a diva, so starting with something like origami or printer paper is a smart move.
Mistakes? Embrace them! Every wrinkle tells a story in the origami universe, and who doesn’t love a good plot twist? With practice, you’ll find that folding becomes second nature, like riding a bike, but with a lot more paper and a lot fewer scraped knees.
| Fold Type | Definition | Visual Representation | Real-World Applications |
|---|---|---|---|
| Mountain Fold | Creates a peak, crease on top when folded behind. | ▲ (peak) | Seen in hats and various origami designs. |
| Valley Fold | Creates a dip, crease at the bottom when folded forward. | V (valley) | Resembles bridges and is common in many origami models. |
Folding Techniques for Beginners
Starting your origami journey? The first step is to grab the right paper. Lightweight origami paper is your best friend, unless you’re looking to add a little workout to your folding session. Diagrams will be your GPS in this paper adventure, so don’t be afraid to rely on them, even if they look like a treasure map drawn by a toddler. Take your time, because rushing leads to folds that look like they’ve had a rough night out. Your fingers are your secret weapons, think of them as tiny folding machines ready to create magic!
Begin with simple models, like a paper boat or a traditional crane, to build confidence before you attempt the origami version of climbing Mount Everest. Video tutorials can be a lifesaver; after all, who wouldn’t prefer watching someone fold instead of reading about it? Feel free to experiment with new folds to impress your friends, because nothing says “I’m a folding genius” like a surprise origami dinosaur at a dinner party.
Remember, patience is key. Everyone starts somewhere, even if it means crafting a dozen paper airplanes that just won’t fly right. If you hit a snag, don’t hesitate to ask for help, join an origami group or find a friend who’s a folding guru. And when you finally finish your first crane, celebrate! Treat yourself to a cupcake because you’ve earned it. Happy folding!
- Start with the Right Paper: Use lightweight origami paper for easy folding, unless you want a workout.
- Follow Diagrams: Diagrams can be confusing, but they are your best friend in the world of origami, kind of like a GPS for paper!
- Take Your Time: Rushing leads to bad folds, and nobody likes a lumpy origami project.
- Use Your Hands: Don’t be afraid to get in there with your fingers, think of them as tiny folding machines!
- Practice Simple Models First: Start with easy designs to build your confidence before tackling the origami equivalent of a marathon.
- Watch Video Tutorials: Sometimes seeing someone fold is more helpful than reading about it, like watching someone cook instead of reading a recipe.
- Experiment with Different Folds: Try new folds to expand your skills and impress your friends at parties.
- Be Patient with Yourself: Everyone has to start somewhere, even if it means making a paper airplane a dozen times.
- Ask for Help: Join an origami group or find a friend who can teach you a thing or two.
- Celebrate Small Victories: Finished your first crane? Treat yourself to a cupcake, you’ve earned it!
Mountain Fold Instructions Step-by-Step
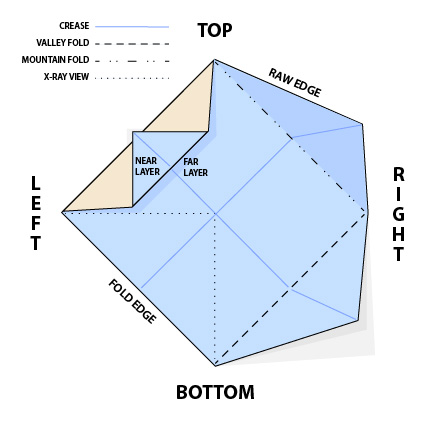
 Credits: paper.gatech.edu
Grab yourself a square piece of paper, not a pizza slice or anything weird, okay? Now, flip that paper over so the blank side is facing up, just like a fresh canvas waiting for your creative genius. Next, fold the top edge down to meet the bottom edge, lining them up like they’re going to meet for coffee, super friendly! Crease it firmly, using your fingers to press down. You can even pretend you’re giving the paper a good massage; it deserves it! Now, unfold it and witness the magic: a beautiful mountain shape emerges! Isn’t that something? Do this a few times until you can whip up a mountain fold like a pro. Feeling adventurous? Try folding it diagonally from corner to corner for some extra fun shapes. And don’t forget to experiment with different sizes, bigger paper means bigger mountains, and who doesn’t love a good mountain range? If you have a bone folder lying around, put it to use; it can help you achieve a sharper peak. But here’s the best part: don’t stress about perfection! Remember, mountains have imperfections too, so embrace those quirks and get folding!
Valley Fold Instructions Made Easy
 Credits: paper.gatech.edu
Ready to dive into the world of valley folds? Grab a square piece of paper, because we’re keeping it classy and simple, no rectangles allowed! First, position your paper so the colorful side is facing up, because who doesn’t love a little flair? Now, take one edge of the paper and fold it down to meet the opposite edge. Think of it as crafting a tiny paper canyon, but without the risk of falling in! Make sure to crease that fold well; we want it as flat as a pancake, because lumpy valleys are a no-go in the origami world. Once you have your magnificent crease, unfold the paper and admire that beautiful dip you just created. It’s like your very own mini valley! Don’t worry if it takes a few tries to get it just right, practice makes perfect. Do this a few times until you can fold it without even looking, like a ninja of the paper arts! Want to spice things up? Try creating a valley fold diagonally. It’s a thrilling adventure into new folding territories. And hey, feel free to experiment with different types of paper. Sparkly, patterned, even plain old newspaper, whatever floats your boat! If you mess up, just unfold and try again; there’s no shame in being a folding rookie. Finally, don’t forget to celebrate your victories! Give yourself a mental high-five every time you create a new fold. Who knew folding paper could be this fun?
Practical Tips for Perfect Folds
 Credits: origami.guide
When it comes to origami, having a clean, flat surface is your best friend. Think of it as your folding stage, where the paper will perform its magic. Trying to fold on a bumpy ride is like asking a cat to take a bath, just not going to end well! And speaking of paper, lightweight paper is a game changer. It folds easily and doesn’t tire out your fingers like that last-minute cramming for an exam.
Now, about your folding technique: be gentle but firm. You want to press down with confidence but not crush the paper like it owes you money. Using your fingernails can help create those sharp creases, just be careful, or you might end up with a broken nail and a sad face.
Don’t forget to avoid over-folding. Think of it like a workout; too much can lead to paper fatigue. Give it a breather every now and then. And while you’re folding, put on some music, but not so loud you can’t hear your paper whispering for attention!
Make your folds in sequence. Skipping steps is a recipe for disaster, unless you’re aiming to create a paper monster, which probably isn’t your goal. Mix up your folding techniques to keep things lively, variety is the spice of life after all! Always check your angles; a little precision goes a long way in the origami world.
And if it all goes wrong, don’t sweat it! Laugh it off; after all, it’s just paper. You can always try again, and the next masterpiece is just a fold away!
Common Uses in Origami Designs
Mountain and valley folds are like the bread and butter of origami, essential for so many creations that you’d think they were on a first-name basis with every paper artist! For starters, the iconic crane, a symbol of peace and good luck, kicks off its journey with these folds. It’s a rite of passage for every budding origami enthusiast. Then there are butterflies, those graceful flutterers that can help beginners practice their folding finesse while still managing to look like they just flew in from a garden party.
Flowers? Oh, they’re practically begging for mountain and valley folds to give their petals and leaves some personality. And let’s not forget about boxes, who doesn’t love a cute origami box to stash tiny treasures? It’s like giving your knick-knacks a fancy home!
Animals also get in on the action, from frogs that leap to elephants that… well, they don’t leap, but they sure do look majestic. Action models like jumping frogs are a riot, showcasing how these folds can create fun movements that might just outshine your Saturday night plans.
For the geometric lovers out there, many complex designs rely on these foundational folds to maintain their structure and stability, allowing you to play with shapes that would make a mathematician proud. And when you’re feeling fancy, 3D models pop to life with depth thanks to mountain and valley folds. Even gift wrapping can benefit from these techniques, imagine the faces of your friends when they receive a unique origami gift box instead of the usual gift bag!
Finally, if you’re feeling creative, mountain and valley folds are versatile enough to adapt for unique designs, not just to follow traditional patterns, but to create something entirely your own. The possibilities are endless, and who knows, you might just invent the next big origami trend!
Additional Techniques to Explore
If you thought mountain and valley folds were the end of the story, think again! Let’s add some flair to your origami creations with additional techniques that will make your paper projects pop.
First up, the Cushion Fold, a fancy little trick that adds dimension. It’s like giving your origami a puffy jacket, perfect for those chilly designs that need a bit of warmth! On the flip side, we have the Squash Fold. This technique flattens sections of your model, instantly giving it a sophisticated look without making your head spin.
Feeling like a magician? Try the Reverse Fold! It’s the origami equivalent of pulling a rabbit out of a hat, flipping your fold inside out to surprise everyone. Then there’s the Petal Fold, which adds some lovely curves, perfect for making your designs look organic rather than boxy, like a flower blooming on a spring day.
If you’re looking to stretch your origami skills, the Inside Reverse Fold is like a paper yoga pose: flexible and versatile. Meanwhile, the Outside Reverse Fold is for when you want to show off your folding prowess, think of it as the acrobat of the origami world!
Before diving into complex designs, don’t forget about Pre-Creasing. It’s like warming up before a workout, helping your paper get into the groove. And for those who like layering, combining different folds can create rich textures and depth in your masterpieces. The Blintz Fold is a classic that brings corners to the center, setting a solid foundation for many models.
Finally, let your creativity run wild! Don’t be afraid to mix and match these techniques. After all, in the world of origami, your imagination is the only limit, so go ahead, let loose and see what unfolds!
Recommended Practice Models for Fun
Looking for some fun models to practice your mountain and valley folds? Look no further! Let’s dive into some delightful designs that will have you folding like a pro in no time. First up, the Boaz Butterfly is a charming little model that’s as easy as pie, and it’s a great way to get comfortable with those folds. If you’re feeling classic, why not try the Origami Crane? This timeless design uses both types of folds and is sure to impress anyone who sees it, who doesn’t love a good crane?
For those just starting out, simple boxes are a treasure! You can whip up tiny boxes to stash your little knickknacks, and they’re a perfect way to practice your skills. Want to add some bounce to your folding? The Jumping Frog is a ribbiting choice that uses both folds and will have your friends leaping for joy!
Let’s not forget about the cute and quacky ducks that are easy to fold, making them a fantastic option for beginners. If you want to add a touch of elegance, try crafting some simple origami flowers. They’re not just pretty, but also a great way to master your folds.
Feeling a bit whimsical? Why not create a simple hat to wear? You can strut your stuff while practicing those mountain folds! And if you’re in the mood for something festive, a simple star can add a touch of sparkle to your décor, easy to make and oh so satisfying.
Let’s not swim past the fish models either, as they’re a fun way to explore aquatic folding while practicing your techniques. Finally, geometric shapes are a fantastic way to get comfortable with various folds, giving you a solid foundation for more complex designs. So grab some paper and start folding, because these fun models are just waiting to be made!
Resources for Further Learning on Folds
If you’re ready to dive deeper into the world of folds, you’re in luck! There are so many resources out there, it’s like a never-ending buffet of origami goodness. First off, check out the Origami Guide, where step-by-step tutorials make folding easier than trying to fold a fitted sheet (and we all know how that goes!). YouTube is another treasure trove; just type “origami” and prepare to be amazed by the number of channels dedicated to teaching you how to fold paper into anything from a simple crane to a complex dragon.
Books can be your best friend too, especially if you visit your local library or bookstore. They often have in-depth techniques and models that can help you level up your folding game. If you’re looking for a more interactive experience, consider joining online forums where you can ask your burning questions and share your creations with fellow enthusiasts.
Workshops are also a fantastic way to learn; there’s nothing like learning from experienced folders in person. Plus, if you follow origami artists on social media platforms like Instagram or Pinterest, you can gather endless inspiration and tutorials right at your fingertips. And for the busy bee on the go, there are mobile apps designed to teach you origami, so you can fold while waiting in line for your coffee.
Don’t forget to check out local craft stores for classes or workshops, sometimes they even have special events! Speaking of events, attending origami conventions, whether local or national, is a great way to meet experts and pick up new techniques. So go ahead, grab your paper, and start folding your way into the wonderful world of origami!
Frequently Asked Questions
What are mountain and valley folds in paper crafting?
Mountain folds are the peaks you create by bending the paper down, while valley folds are the dips where you fold it up. Think of it like making a paper rollercoaster, up and down all the way!
How do I make a mountain fold without a ruler?
You can just use your fingers! Pinch the paper at the fold line and gently press down, like you’re trying to make a cool paper airplane, but with less flight and more folding finesse.
Can I use any type of paper for mountain and valley folds?
Totally! You can use plain paper, colored cardstock, or even that fancy origami paper you’ve been saving for a rainy day. Just remember, thicker paper may require some extra muscle!
Are mountain and valley folds important in origami?
Absolutely! They’re like the bread and butter of origami. If you want to create those awesome shapes, you better get cozy with these folds, or you might end up with a very confused paper crane!
What if my folds aren’t perfect?
Hey, perfection is overrated! A little wonkiness just adds character. Besides, if your folds look like they were made by a cat, just say you’re going for the ‘abstract’ look!
TL;DR Ready to dive into the world of folds? Mountain and valley folds are the bread and butter of origami, with mountain folds creating peaks and valley folds crafting dips. Get started with our easy instructions, sharp creases, and practice with fun models like the Boaz Butterfly and the iconic Origami Crane. Remember, precise folds lead to happier origami! Don’t forget to check out some handy resources for extra tips and tricks. Folding may take practice, but hey, at least it’s paper, not your hopes and dreams!