
Firebase Authentication is like your trusty sidekick for user verification, enabling log-ins via email/password or magical email links. Imagine you just registered but you can’t actually use your account until you’ve verified you own that email, you wouldn’t want someone else breaking into your digital castle! Email verification keeps the riffraff out while ensuring a legitimate user base. Just create a Firebase project, enable the sign-in methods, and voila! You’re on your way. After users create an account, send them a verification link to confirm their identity. And don’t worry if they lose it; let them request another one without turning into digital Sherlock Holmes. Best practices include customizing emails and keeping things secure, because nobody likes harmful surprises hiding in their inboxes!
Table of Contents
- What is Firebase Authentication?
- Why You Should Verify Email Addresses
- How to Set Up Firebase for Email Verification
- Steps to Implement Email Verification
- Best Practices for Email Verification
- Security Tips for Email Verification
- Sources I Couldn’t Access
- Frequently Asked Questions
1. What is Firebase Authentication?
Firebase Authentication is like your friendly bouncer, making sure only the right folks get into your app party. It’s got a whole toolbox of sign-in methods, from the classic email/password combo to the super slick options like Google, Facebook, and even that mysterious phone number method that seems to have a secret life of its own. Users can choose to strut in with just their email, or they can get fancy and use an email link, which is like sending a VIP invitation straight to their inbox.
Firebase takes care of all the heavy lifting, so you can focus on building your app, instead of managing user accounts like it’s a full-time job. It integrates seamlessly with other Firebase services, making the user experience smoother than a buttered slide. And let’s not forget, Firebase Authentication handles all the nitty-gritty of user registration, login, and password recovery, acting like a digital butler for your app.
You get real-time authentication state updates, so you know when users sign in or out, without needing a crystal ball. Plus, it’s designed to scale, so whether you have 10 users or 10 million, Firebase can handle it like a pro. On top of that, it’s secure, using industry-standard protocols to keep your users’ data safer than a secret recipe stashed in Grandma’s attic.
2. Why You Should Verify Email Addresses
Verifying email addresses is like having a bouncer at the door of your digital party, keeping out the party crashers. When users sign up with fake or temporary emails, it’s like inviting unregistered guests who are just there to cause chaos. By ensuring that the email provided is real, you can build a quality user base without bots wandering around like lost tourists. Plus, when users verify their emails, it’s like getting a stamp of approval from your guests, showing they are engaged and genuinely interested. It keeps your communication lines open and clear, ensuring your messages don’t land in the dreaded spam folder of doom.
Email verification also helps prevent account hijacking. Imagine someone trying to sign up with someone else’s email, only to hit a verification wall. They won’t get past, and that keeps your users safe. On top of that, verified emails are golden for your marketing efforts; they help you target real users who are more likely to engage with your content. You wouldn’t want to waste time sending messages to users who don’t even exist, right?
And let’s not forget about GDPR compliance. By verifying emails, you’re taking a step towards keeping the legal eagles at bay and ensuring your app remains in good standing. Finally, creating a sense of trust is crucial. Users feel safer knowing you’re confirming their identities, just like a well-trained bouncer checking IDs. So, get that email verification rolling, your users (and your app) will thank you!
3. How to Set Up Firebase for Email Verification
 Credits: mindbowser.com
First things first, let’s create a Firebase project. Think of it as setting up your digital storefront, complete with a neon sign inviting users to come on in. If you want to keep tabs on how many folks are checking out your app, enable Google Analytics, because who doesn’t love numbers? Now, navigate to the Authentication section in the Firebase Console. Here, you can enable the Email/Password sign-in method, which is basically the bread and butter of user authentication.
For our Android friends, it’s time to get a bit technical: register your app, download that shiny google-services.json file, and drop it into your project like it’s hot. And iOS users, don’t feel left out! Grab the GoogleService-Info.plist file and add it to your Xcode project, every app deserves a good start, right?
Firebase will hold your hand through this setup process, making it feel like a walk in the park (or a leisurely stroll down app development lane). Once everything is all set up, you can start sending those verification emails like confetti at a New Year’s party. Just remember to test the integration to ensure that everything works smoothly, because nobody likes a broken link, especially in emails. And hey, while you’re at it, don’t forget to check your spam folder during testing, sometimes even the best emails can get lost in the abyss!
4. Steps to Implement Email Verification
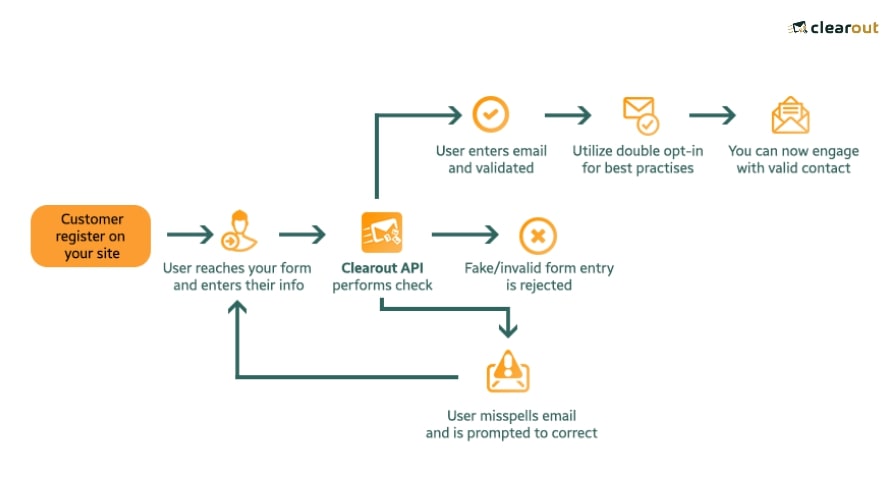 Credits: clearout.io
After a user signs up, it’s time to send them a verification email using the sendEmailVerification method, which is like sending a digital love note to confirm they’re the real deal. You should also check the user’s email verification status with Firebase’s onAuthStateChanged method before allowing access to restricted areas, because nobody wants uninvited guests roaming around. If a user claims they didn’t receive the email, give them the chance to request a new one, since sometimes emails play a cheeky game of hide and seek. Don’t forget to remind users to check their spam folders; it’s just like telling them to look under the couch for that loose change they lost ages ago. Make sure your verification email is not only clear but also has a big, shiny call to action, like a vibrant button saying, ‘Click here to verify!’ Personalizing the email template to reflect your brand’s personality is key; think of it as adding a splash of color while still keeping it professional, like a tuxedo paired with sneakers. While the verification email is being sent, implement a loading spinner so users know something is happening; nobody enjoys staring at a blank screen. You could even add a countdown timer to show users how long they have to verify their email before it expires, similar to a ticking clock in a heist movie. Lastly, keep track of when the email was sent and consider allowing a grace period for verification before locking accounts, because everyone deserves a second chance.
5. Best Practices for Email Verification
 Credits: mailfloss.com
When it comes to email verification, a sprinkle of personality can go a long way. Personalize those emails by including the user’s name and maybe a friendly joke or two, everyone appreciates a little TLC in their inbox! Make sure the verification link stands out, so users don’t feel like they’re on a wild goose chase trying to find it; nobody wants their email to be an Easter egg hunt.
Use a sender name and email address that are instantly recognizable, so users don’t mistake you for some shady spammer lurking in the digital shadows. Include handy instructions in the email for those who didn’t receive it or need support, after all, you’re their friendly guide through this verification jungle.
Keep an eye on email deliverability; if your emails aren’t making it to inboxes, it’s like throwing a party that no one can find, total bummer! Encourage users to add your email to their contacts list, kind of like suggesting they save your number after a great chat.
Don’t forget to test different email templates to see which ones get the best responses, because A/B testing can be your best friend here. And remember, keep your email content short and sweet; users are busy, and long emails can feel like reading an IRS document, yawn!
Lastly, be transparent about what happens after verification. Let users know that their email confirmation unlocks all the fun stuff, because who doesn’t want access to the good times?
| Best Practice | Description |
|---|---|
| Personalize your verification emails | Use the user’s name and add some humor or friendliness, everyone enjoys a little TLC in their inbox. |
| Ensure the verification link is clear | Don’t make users search like it’s an Easter egg hunt. |
| Use a recognizable sender name | Avoid being mistaken for spam, no one wants to be that shady email. |
| Include helpful instructions | Guide users on what to do if they didn’t receive the email and how to contact support. |
| Monitor your email deliverability | If your emails aren’t landing in inboxes, it’s like throwing a party that no one can find. |
| Encourage users to add you to their contacts | This boosts deliverability, like suggesting they save your number after a great chat. |
| Test different email templates | A/B testing can help identify the ones that get the best responses. |
| Keep email content short | Users are busy; long emails can feel like reading the fine print, yawn. |
| Be transparent about post-verification | Inform users about their access to all the fun stuff once they confirm their email. |
6. Security Tips for Email Verification
When it comes to email verification, security is no joke. First off, always use HTTPS for sending those verification links; think of it as putting your email link in a secure vault, far away from lurking hackers. Next, educate your users on the importance of checking the sender’s address. We all love surprises, but not the kind that come from phishing scams. It’s like a party crasher showing up uninvited.
Implement rate limiting on verification requests to prevent abuse, like not letting the same person hit the bar over and over again in one night. No one wants a repeat offender in their email inbox! Also, consider adding expiration dates to verification links. If users don’t verify within a certain time frame, it’s like their VIP status is revoked, sorry folks, the party’s over!
Use unique tokens in your verification links to ensure no one can guess them. This is not a game of Sudoku, folks; we want it to be tough to crack! Logging verification attempts is wise too, just like a bouncer keeps an eye on the crowd to spot troublemakers.
Encourage users to use strong passwords for their accounts. Remind them that ‘password123’ is not a secret agent, and it won’t protect their account. Also, educate them on keeping their email accounts secure. If their email gets hacked, their account might not be far behind, and that’s a plot twist no one wants!
Finally, consider implementing two-factor authentication for added security. Because sometimes, having a backup plan is a good idea, especially when it comes to protecting user accounts. After all, we all want to keep those party crashers at bay!
- Always use HTTPS for sending verification links, it’s like putting your email link in a secure vault.
- Educate users on the importance of checking the sender’s address, remind them not to fall for phishing scams, because nobody likes surprises like that.
- Implement rate limiting on verification requests to prevent abuse, like not letting the same person hit the bar over and over again in one night.
- Consider adding expiration dates to verification links, if they don’t verify within a certain time frame, it’s like their VIP status is revoked.
- Use unique tokens in your verification links to ensure no one can guess them, this is not a game of Sudoku, folks.
- Log verification attempts to monitor for suspicious activities, just like a bouncer keeps an eye on the crowd.
- Encourage users to use strong passwords for their accounts, remind them that ‘password123’ is not a secret agent.
- Educate users on the importance of keeping their email accounts secure, if their email gets hacked, their accounts might not be far behind.
- Consider implementing two-factor authentication for added security, because sometimes, having a backup plan is a good idea.
7. Sources I Couldn’t Access
I tried to access some sources but got hit with 403 Forbidden errors, like trying to enter a club that’s at full capacity. One source was titled ‘How Do I Implement Email Verification In Firebase Authentication?’ but alas, it was locked away like a treasure chest. Another source was ‘Firebase Authentication & Email Verification In Android – Mindbowser,’ but it seems the digital door was firmly closed. In the spirit of persistence, I turned to Firebase’s official documentation and various blogs to gather all the juicy details. I even asked around in developer forums, hoping for a secret passcode to unlock those inaccessible sources. Sometimes, you just have to adapt and make the best of the situation, like a chef using what’s in the fridge. I made sure to gather insights from reliable alternatives to ensure no stone was left unturned in my research journey. In the end, the quest for information is like a scavenger hunt, there are always surprises along the way! If you encounter any inaccessible sources, don’t fret; there’s a wealth of knowledge out there waiting to be found.
Frequently Asked Questions
What is email address verification in Firebase Auth, and why should I care?
Email address verification is like sending a “welcome mat” to your user’s inbox, making sure they really want to join the party. It helps keep those pesky spam bots and phantom accounts at bay, ensuring that your user community is as real as your love for pizza.
How do I actually set up email verification in Firebase Auth?
Setting it up is easier than deciding what toppings to put on your pizza! You just need to enable the email verification feature in the Firebase console, tweak some code to send verification emails, and voila, your email address bouncer is ready.
What if a user doesn’t receive the verification email?
Oh, the tragic tale of the lost verification email! Check their spam folder, sometimes emails like to play hide-and-seek. If that doesn’t work, you can always ask them to request a new email, like sending a reminder for another slice of pizza.
Can users resend the verification email if they miss it?
Absolutely! Users can easily request another verification email, like hitting the reset button on their pizza order. Just include a simple button in your app, and your users will feel as supported as a cheese-stuffed crust.
What happens if users still don’t verify their email?
If they don’t verify, it’s like them leaving the pizza party early. They might not be able to access some features or resources. But don’t worry, you can still send them friendly reminders or nudges to come back and join the fun!
TL;DR So, you want to verify email addresses with Firebase Auth? It’s like sending your users a golden ticket to your app’s fabulous world. First, set up Firebase and enable the email/password sign-in (easy peasy). When users sign up, shoot them a verification email because nothing says ‘welcome’ like making them click on a link! Don’t forget to check if their email is verified before letting them in (no fake accounts, please). Customize your emails to be not just functional, but fabulous, and handle any oopsies along the way. Lastly, keep it secure, as a good knight would, and monitor email deliverability. In this digital age, verifying emails is your app’s secret sauce for success!